K3s adalah distribusi Kubernetes yang ringan dan mudah digunakan, ideal untuk lingkungan dengan sumber daya terbatas. Berikut adalah langkah-langkah untuk menginstalnya di Ubuntu 22.04:
Check informasi System Operasi
root@k3s-node-01:~# cat /etc/*ease
DISTRIB_ID=Ubuntu
DISTRIB_RELEASE=22.04
DISTRIB_CODENAME=jammy
DISTRIB_DESCRIPTION="Ubuntu 22.04.3 LTS"
PRETTY_NAME="Ubuntu 22.04.3 LTS"
NAME="Ubuntu"
VERSION_ID="22.04"
VERSION="22.04.3 LTS (Jammy Jellyfish)"
VERSION_CODENAME=jammy
ID=ubuntu
ID_LIKE=debian
HOME_URL="https://www.ubuntu.com/"
SUPPORT_URL="https://help.ubuntu.com/"
BUG_REPORT_URL="https://bugs.launchpad.net/ubuntu/"
PRIVACY_POLICY_URL="https://www.ubuntu.com/legal/terms-and-policies/privacy-policy"
UBUNTU_CODENAME=jammy
root@k3s-node-01:~#
Daftar Host
root@k3s-node-01:~# cat /etc/hosts
127.0.0.1 localhost
127.0.1.1 svr01

192.168.112.101 k3s-node-01
192.168.112.102 k3s-node-02
192.168.112.103 k3s-node-03

# The following lines are desirable for IPv6 capable hosts
::1     ip6-localhost ip6-loopback
fe00::0 ip6-localnet
ff00::0 ip6-mcastprefix
ff02::1 ip6-allnodes
ff02::2 ip6-allrouters
root@k3s-node-01:~#
Install curl
sudo apt install curl -y
root@k3s-node-01:~# apt install curl
Reading package lists... Done
Building dependency tree... Done
Reading state information... Done
curl is already the newest version (7.81.0-1ubuntu1.18).
0 upgraded, 0 newly installed, 0 to remove and 56 not upgraded.
root@k3s-node-01:~#
Instalasi Helm

sudo curl -fsSL -o get_helm.sh https://raw.githubusercontent.com/helm/helm/main/scripts/get-helm-3
sudo chmod 700 get_helm.sh
sudo ./get_helm.sh
root@k3s-node-01:~# sudo curl -fsSL -o get_helm.sh https://raw.githubusercontent.com/helm/helm/main/scripts/get-helm-3
root@k3s-node-01:~# ls -l
total 16
-rw-r--r-- 1 root root 11694 Aug 29 09:16 get_helm.sh
drwx------ 3 root root 4096 Jun 20 2023 snap
root@k3s-node-01:~#
root@k3s-node-01:~# sudo chmod 700 get_helm.sh
root@k3s-node-01:~#
root@k3s-node-01:~# sudo ./get_helm.sh
Downloading https://get.helm.sh/helm-v3.15.4-linux-amd64.tar.gz
Verifying checksum… Done.
Preparing to install helm into /usr/local/bin
helm installed into /usr/local/bin/helm
root@k3s-node-01:~#
root@k3s-node-01:~#
Check version
helm version
Contoh output :
root@k3s-node-01:~# helm version
version.BuildInfo{Version:"v3.16.2", GitCommit:"13654a52f7c70a143b1dd51416d633e1071faffb", GitTreeState:"clean", GoVersion:"go1.22.7"}
root@k3s-node-01:~#
Melakukan instalasi K3s
Untuk mengecek versi k3s : https://github.com/k3s-io/k3s/releases
Jika akan menggunakan rancher, sebaiknya melihat kompatibility matrik dari rancher :
Master 1
echo "192.168.112.101 k3s-node-01" >> /etc/hosts
echo "192.168.112.102 k3s-node-02" >> /etc/hosts
echo "192.168.112.103 k3s-node-02" >> /etc/hosts
curl -sfL https://get.k3s.io | INSTALL_K3S_VERSION=v1.29.9+k3s1 sh -s - server --cluster-init
Master 2
echo "192.168.112.101 k3s-node-01" >> /etc/hosts
echo "192.168.112.102 k3s-node-02" >> /etc/hosts
echo "192.168.112.103 k3s-node-02" >> /etc/hosts
curl -sfL https://get.k3s.io | INSTALL_K3S_VERSION=v1.27.11+k3s1 K3S_TOKEN=NomerTokenAndaBebas sh -s - server --server https://k3s-node-01:6443
Master 3
echo "192.168.112.101 k3s-node-01" >> /etc/hosts
echo "192.168.112.102 k3s-node-02" >> /etc/hosts
echo "192.168.112.103 k3s-node-02" >> /etc/hosts
curl -sfL https://get.k3s.io | INSTALL_K3S_VERSION=v1.27.11+k3s1 K3S_TOKEN=NomerTokenAndaBebas sh -s - server --server https://k3s-node-02:6443
Setting kubectl
sudo mkdir ~/.kube
sudo kubectl config view --raw > ~/.kube/config
sudo chmod o-r ~/.kube/config
sudo chmod g-r ~/.kube/config
root@k3s-node-01:~# sudo mkdir ~/.kube
root@k3s-node-01:~# sudo kubectl config view --raw > ~/.kube/config
root@k3s-node-01:~#
root@k3s-node-01:~# sudo chmod o-r ~/.kube/config
root@k3s-node-01:~# sudo chmod g-r ~/.kube/config
root@k3s-node-01:~#
Menambahkan helm repository
sudo helm repo add rancher-latest https://releases.rancher.com/server-charts/latest
sudo helm repo add jetstack https://charts.jetstack.io
sudo helm repo update
root@k3s-node-01:~# sudo helm repo add rancher-latest https://releases.rancher.com/server-charts/latest
"rancher-latest" has been added to your repositories
root@k3s-node-01:~# sudo helm repo add jetstack https://charts.jetstack.io
"jetstack" has been added to your repositories
root@k3s-node-01:~# sudo helm repo update
Hang tight while we grab the latest from your chart repositories…
…Successfully got an update from the "jetstack" chart repository
…Successfully got an update from the "rancher-latest" chart repository
Update Complete. ⎈Happy Helming!⎈
root@k3s-node-01:~#
Install cert manager
kubectl apply -f https://github.com/cert-manager/cert-manager/releases/download/v1.15.1/cert-manager.crds.yaml
contoh output :
root@k3s-node-01:~# kubectl apply -f https://github.com/cert-manager/cert-manager/releases/download/v1.15.1/cert-manager.crds.yaml
customresourcedefinition.apiextensions.k8s.io/certificaterequests.cert-manager.io created
customresourcedefinition.apiextensions.k8s.io/certificates.cert-manager.io created
customresourcedefinition.apiextensions.k8s.io/challenges.acme.cert-manager.io created
customresourcedefinition.apiextensions.k8s.io/clusterissuers.cert-manager.io created
customresourcedefinition.apiextensions.k8s.io/issuers.cert-manager.io created
customresourcedefinition.apiextensions.k8s.io/orders.acme.cert-manager.io created
root@k3s-node-01:~#
helm install cert-manager jetstack/cert-manager --namespace cert-manager --create-namespace
root@k3s-node-01:~# helm install cert-manager jetstack/cert-manager --namespace cert-manager --create-namespace
NAME: cert-manager
LAST DEPLOYED: Thu Aug 29 09:44:44 2024
NAMESPACE: cert-manager
STATUS: deployed
REVISION: 1
TEST SUITE: None
NOTES:
cert-manager v1.15.3 has been deployed successfully!

In order to begin issuing certificates, you will need to set up a ClusterIssuer
or Issuer resource (for example, by creating a 'letsencrypt-staging' issuer).

More information on the different types of issuers and how to configure them
can be found in our documentation:
https://cert-manager.io/docs/configuration/

For information on how to configure cert-manager to automatically provision
Certificates for Ingress resources, take a look at the ingress-shim
documentation:
https://cert-manager.io/docs/usage/ingress/
root@k3s-node-01:~#
Install Rancher
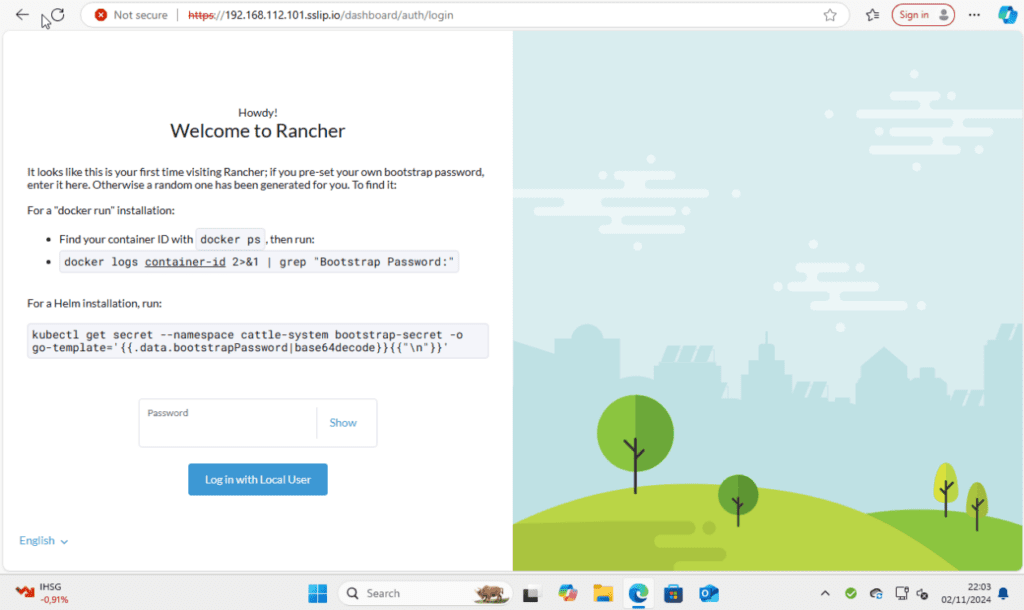
Jika belum mempunyai domain, bisa menggunakan domain *.sslip.io domain ini akan meresolve dalam ip, contoh jika kita membuat 192.168.112.101.sslip.io ketika di ping akan reply ip 192.168.112.101
helm install rancher rancher-latest/rancher --namespace cattle-system --set hostname=192.168.112.101.sslip.io --set replicas=3 --set bootstrapPassword=Passw0rdRancher --create-namespace
root@k3s-node-01:~# helm install rancher rancher-latest/rancher --namespace cattle-system --set hostname=10.20.30.155.sslip.io --set replicas=3 --set bootstrapPassword=P455w0rdRancher --create-namespace
NAME: rancher
LAST DEPLOYED: Thu Aug 29 10:08:36 2024
NAMESPACE: cattle-system
STATUS: deployed
REVISION: 1
TEST SUITE: None
NOTES:
Rancher Server has been installed.

NOTE: Rancher may take several minutes to fully initialize. Please standby while Certificates are being issued, Containers are started and the Ingress rule comes up.

Check out our docs at https://rancher.com/docs/

If you provided your own bootstrap password during installation, browse to https://192.168.112.101.sslip.io to get started.

If this is the first time you installed Rancher, get started by running this command and clicking the URL it generates:

echo https://192.168.112.101.sslip.io/dashboard/?setup=$(kubectl get secret --namespace cattle-system bootstrap-secret -o go-template='{{.data.bootstrapPassword|base64decode}}')

To get just the bootstrap password on its own, run:

kubectl get secret --namespace cattle-system bootstrap-secret -o go-template='{{.data.bootstrapPassword|base64decode}}{{ "\n" }}'

Happy Containering!
root@k3s-node-01:~#
Check Password Rancher
echo https://10.20.30.155.sslip.io/dashboard/?setup=$(kubectl get secret --namespace cattle-system bootstrap-secret -o go-template='{{.data.bootstrapPassword|base64decode}}')root@k3s-node-01:~# kubectl get secret --namespace cattle-system bootstrap-secret -o go-template='{{.data.bootstrapPassword|base64decode}}{{ "\n" }}'
Passw0rdRancher
root@k3s-node-01:~#Check status deployment
kubectl -n cattle-system rollout status deploy/rancher
root@k3s-node-01:~# kubectl -n cattle-system rollout status deploy/rancher
deployment "rancher" successfully rolled out
root@k3s-node-01:~#
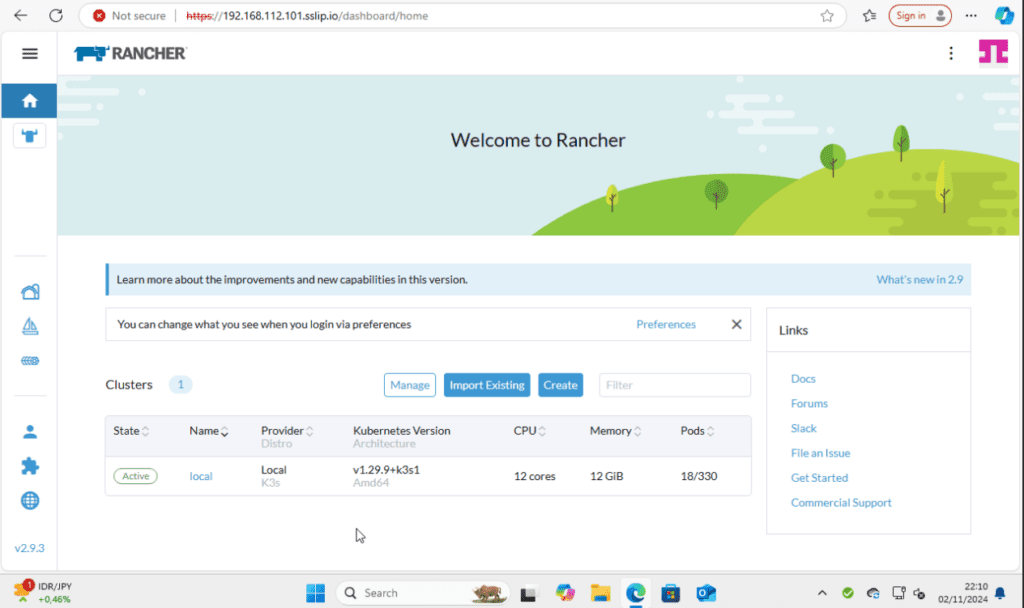
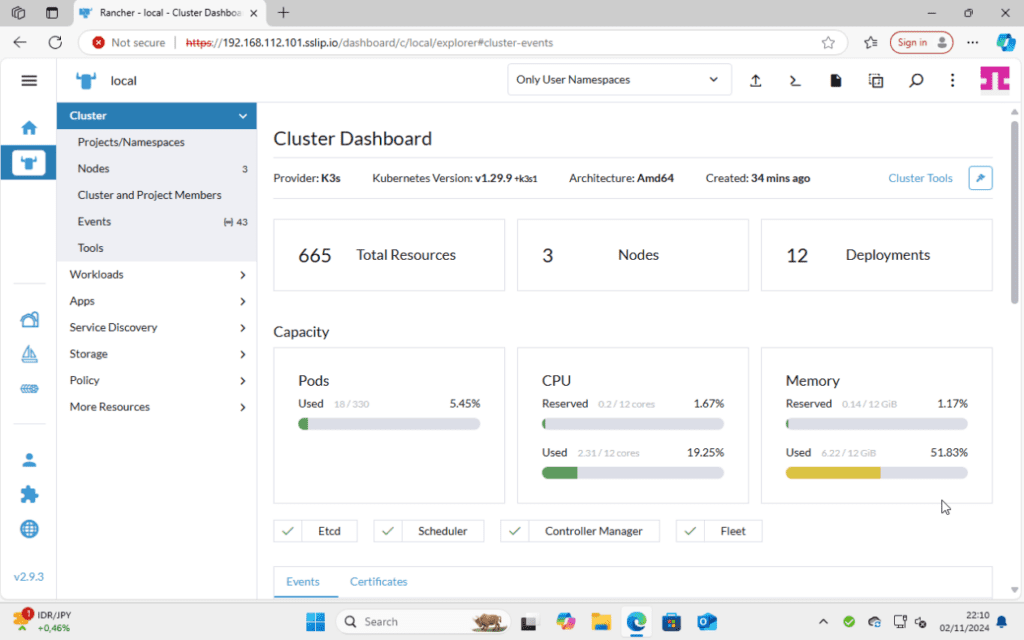
Masuk ke GUI rancher


root@k3s-node-01:~# apt install nfs-common
Reading package lists... Done
Building dependency tree... Done
Reading state information... Done
The following additional packages will be installed:
  keyutils libevent-core-2.1-7 libnfsidmap1 rpcbind
Suggested packages:
  watchdog
The following NEW packages will be installed:
  keyutils libevent-core-2.1-7 libnfsidmap1 nfs-common rpcbind
0 upgraded, 5 newly installed, 0 to remove and 56 not upgraded.
Need to get 475 kB of archives.
After this operation, 1709 kB of additional disk space will be used.
Do you want to continue? [Y/n] Y
Get:1 http://id.archive.ubuntu.com/ubuntu jammy/main amd64 libevent-core-2.1-7 amd64 2.1.12-stable-1build3 [93.9 kB]
Get:2 http://id.archive.ubuntu.com/ubuntu jammy-updates/main amd64 libnfsidmap1 amd64 1:2.6.1-1ubuntu1.2 [42.9 kB]
Get:3 http://id.archive.ubuntu.com/ubuntu jammy/main amd64 rpcbind amd64 1.2.6-2build1 [46.6 kB]
Get:4 http://id.archive.ubuntu.com/ubuntu jammy/main amd64 keyutils amd64 1.6.1-2ubuntu3 [50.4 kB]
Get:5 http://id.archive.ubuntu.com/ubuntu jammy-updates/main amd64 nfs-common amd64 1:2.6.1-1ubuntu1.2 [241 kB]
Fetched 475 kB in 2s (219 kB/s)
debconf: delaying package configuration, since apt-utils is not installed
Selecting previously unselected package libevent-core-2.1-7:amd64.
(Reading database ... 99888 files and directories currently installed.)
Preparing to unpack .../libevent-core-2.1-7_2.1.12-stable-1build3_amd64.deb ...
Unpacking libevent-core-2.1-7:amd64 (2.1.12-stable-1build3) ...
Selecting previously unselected package libnfsidmap1:amd64.
Preparing to unpack .../libnfsidmap1_1%3a2.6.1-1ubuntu1.2_amd64.deb ...
Unpacking libnfsidmap1:amd64 (1:2.6.1-1ubuntu1.2) ...
Selecting previously unselected package rpcbind.
Preparing to unpack .../rpcbind_1.2.6-2build1_amd64.deb ...
Unpacking rpcbind (1.2.6-2build1) ...
Selecting previously unselected package keyutils.
Preparing to unpack .../keyutils_1.6.1-2ubuntu3_amd64.deb ...
Unpacking keyutils (1.6.1-2ubuntu3) ...
Selecting previously unselected package nfs-common.
Preparing to unpack .../nfs-common_1%3a2.6.1-1ubuntu1.2_amd64.deb ...
Unpacking nfs-common (1:2.6.1-1ubuntu1.2) ...
Setting up libnfsidmap1:amd64 (1:2.6.1-1ubuntu1.2) ...
Setting up rpcbind (1.2.6-2build1) ...
Created symlink /etc/systemd/system/multi-user.target.wants/rpcbind.service → /lib/systemd/system/rpcbind.service.
Created symlink /etc/systemd/system/sockets.target.wants/rpcbind.socket → /lib/systemd/system/rpcbind.socket.
Setting up libevent-core-2.1-7:amd64 (2.1.12-stable-1build3) ...
Setting up keyutils (1.6.1-2ubuntu3) ...
Setting up nfs-common (1:2.6.1-1ubuntu1.2) ...
debconf: unable to initialize frontend: Dialog
debconf: (No usable dialog-like program is installed, so the dialog based frontend cannot be used. at /usr/share/perl5/Debconf/FrontEnd/Dialog.pm line 78.)
debconf: falling back to frontend: Readline

Creating config file /etc/idmapd.conf with new version
debconf: unable to initialize frontend: Dialog
debconf: (No usable dialog-like program is installed, so the dialog based frontend cannot be used. at /usr/share/perl5/Debconf/FrontEnd/Dialog.pm line 78.)
debconf: falling back to frontend: Readline
debconf: unable to initialize frontend: Dialog
debconf: (No usable dialog-like program is installed, so the dialog based frontend cannot be used. at /usr/share/perl5/Debconf/FrontEnd/Dialog.pm line 78.)
debconf: falling back to frontend: Readline

Creating config file /etc/nfs.conf with new version
Adding system user `statd' (UID 109) ...
Adding new user `statd' (UID 109) with group `nogroup' ...
Not creating home directory `/var/lib/nfs'.
Created symlink /etc/systemd/system/multi-user.target.wants/nfs-client.target → /lib/systemd/system/nfs-client.target.
Created symlink /etc/systemd/system/remote-fs.target.wants/nfs-client.target → /lib/systemd/system/nfs-client.target.
auth-rpcgss-module.service is a disabled or a static unit, not starting it.
nfs-idmapd.service is a disabled or a static unit, not starting it.
nfs-utils.service is a disabled or a static unit, not starting it.
proc-fs-nfsd.mount is a disabled or a static unit, not starting it.
rpc-gssd.service is a disabled or a static unit, not starting it.
rpc-statd-notify.service is a disabled or a static unit, not starting it.
rpc-statd.service is a disabled or a static unit, not starting it.
rpc-svcgssd.service is a disabled or a static unit, not starting it.
rpc_pipefs.target is a disabled or a static unit, not starting it.
var-lib-nfs-rpc_pipefs.mount is a disabled or a static unit, not starting it.
Processing triggers for libc-bin (2.35-0ubuntu3.8) ...
debconf: unable to initialize frontend: Dialog
debconf: (No usable dialog-like program is installed, so the dialog based frontend cannot be used. at /usr/share/perl5/Debconf/FrontEnd/Dialog.pm line 78.)
debconf: falling back to frontend: Readline
Scanning processes...
Scanning linux images...

Running kernel seems to be up-to-date.

No services need to be restarted.

No containers need to be restarted.

No user sessions are running outdated binaries.

No VM guests are running outdated hypervisor (qemu) binaries on this host.
root@k3s-node-01:~#
root@k3s-node-01:~# cat /etc/multipath.conf
defaults {
    user_friendly_names yes
}
root@k3s-node-01:~#
root@k3s-node-01:~# nano /etc/multipath.conf
root@k3s-node-01:~#
root@k3s-node-01:~# cat /etc/multipath.conf
defaults {
    user_friendly_names yes
}


blacklist {
    devnode "^sd[a-z0-9]+"
}
root@k3s-node-01:~#
root@k3s-node-01:~# systemctl restart multipathd.service
root@k3s-node-01:~#
Reference :
https://longhorn.io/kb/troubleshooting-volume-with-multipath