Pada tutorial ini akan membahas bagaimana cara menginstall Pi-Hole Docker pada Armbian 23.02 (Ubuntu 20.04)


Pi-Hole is a software that act as your DNS provider to actively block internet ads and trackers. It does this by filtering the DNS requests and sending any blocked domains into a blackhole, so the request is never completed.
Another cool thing about Pi-Hole is that it can also work well to monitor your network traffic, as you can set it to log any DNS requests that the server receives.
While this software is perfect for devices like the Raspberry Pi, you can install it on any Linux machine. Or, when using Docker, you can even run Pi-Hole on a Windows device.
You can run Pi-Hole on your devices in many ways, but one of the easiest is to use Docker. The advantage of using Docker is that everything you need is set up within the container.
Please note that we tested the following steps for installing Pi-Hole through a Docker container on an Ubuntu system. However, they should work fine on any system where you can install “Docker” and “Docker Compose”.
Preparing your System to Run Pi-Hole as a Container
These first few steps will get your Linux system set up to run Pi-Hole through a Docker container. If you already have Docker installed on your system, you can skip to the “Installing the Pi-Hole Docker Container” section.
1. Mengupdate dan mengupgrade paket pada sistem operasi
Untuk mengupdate dan mengupgrade paket jalankan perintah berikut ini :
sudo apt update && sudo apt upgrade
2. Menginstall paket pendukung
sudo apt install apt-transport-https ca-certificates curl software-properties-common
root@xcozy:~# sudo apt install apt-transport-https ca-certificates curl software-properties-common
Reading package lists... Done
Building dependency tree
Reading state information... Done
ca-certificates is already the newest version (20230311ubuntu0.20.04.1).
curl is already the newest version (7.68.0-1ubuntu2.19).
software-properties-common is already the newest version (0.99.9.11).
The following NEW packages will be installed:
  apt-transport-https
0 upgraded, 1 newly installed, 0 to remove and 0 not upgraded.
Need to get 1.704 B of archives.
After this operation, 162 kB of additional disk space will be used.
Do you want to continue? [Y/n] Y
Get:1 http://ports.ubuntu.com focal-updates/universe arm64 apt-transport-https all 2.0.9 [1.704 B]
Fetched 1.704 B in 1s (2.896 B/s)
Selecting previously unselected package apt-transport-https.
(Reading database ... 166014 files and directories currently installed.)
Preparing to unpack .../apt-transport-https_2.0.9_all.deb ...
Unpacking apt-transport-https (2.0.9) ...
Setting up apt-transport-https (2.0.9) ...
root@xcozy:~#
sudo apt install docker-compose
Mengunduh dan menginstall gpg key untuk paket docker
curl -fsSL https://download.docker.com/linux/ubuntu/gpg | sudo gpg --dearmor -o /usr/share/keyrings/docker-archive-keyring.gpg
root@xcozy:~# curl -fsSL https://download.docker.com/linux/ubuntu/gpg | sudo gpg --dearmor -o /usr/share/keyrings/docker-archive-keyring.gpg
root@xcozy:~#
Menginstall repository untuk docker
echo "deb [arch=$(dpkg --print-architecture) signed-by=/usr/share/keyrings/docker-archive-keyring.gpg] https://download.docker.com/linux/ubuntu $(lsb_release -cs) stable" | sudo tee /etc/apt/sources.list.d/docker.list > /dev/null
root@xcozy:~# echo "deb [arch=$(dpkg --print-architecture) signed-by=/usr/share/keyrings/docker-archive-keyring.gpg] https://download.docker.com/linux/ubuntu $(lsb_release -cs) stable" | sudo tee /etc/apt/sources.list.d/docker.list > /dev/null
root@xcozy:~#
Melakukan update repository setelah penambahan repository docker
root@xcozy:~# sudo apt update
Hit:1 http://download.zerotier.com/debian/focal focal InRelease
Hit:2 http://ports.ubuntu.com focal InRelease
Hit:3 http://ports.ubuntu.com focal-security InRelease
Hit:4 http://ppa.launchpad.net/oibaf/graphics-drivers/ubuntu focal InRelease
Get:6 https://download.docker.com/linux/ubuntu focal InRelease [57,7 kB]
Hit:7 http://ports.ubuntu.com focal-updates InRelease
Hit:8 http://ports.ubuntu.com focal-backports InRelease
Hit:9 http://ppa.launchpad.net/saiarcot895/chromium-dev/ubuntu focal InRelease
Get:5 http://mirror.ossplanet.net/armbian/apt focal InRelease [52,4 kB]
Get:10 https://download.docker.com/linux/ubuntu focal/stable arm64 Packages [36,7 kB]
Get:11 http://mirror.ossplanet.net/armbian/apt focal/main armhf Packages [460 kB]
Get:12 http://mirror.ossplanet.net/armbian/apt focal/main arm64 Packages [803 kB]
Get:13 http://mirror.ossplanet.net/armbian/apt focal/main all Packages [90,0 kB]
Fetched 1.500 kB in 6s (259 kB/s)
Reading package lists... Done
Building dependency tree
Reading state information... Done
All packages are up to date.
root@xcozy:~#
Menginstall aplikasi docker dengan menjalankan perintah berikut ini :
sudo apt install docker-ce docker-ce-cli containerd.io
root@xcozy:~# sudo apt install docker-ce docker-ce-cli containerd.io
Reading package lists... Done
Building dependency tree
Reading state information... Done
Suggested packages:
  cgroupfs-mount | cgroup-lite
Recommended packages:
  apparmor docker-ce-rootless-extras pigz docker-buildx-plugin docker-compose-plugin
The following NEW packages will be installed:
  containerd.io docker-ce docker-ce-cli
0 upgraded, 3 newly installed, 0 to remove and 0 not upgraded.
Need to get 46,3 MB of archives.
After this operation, 201 MB of additional disk space will be used.
Get:1 https://download.docker.com/linux/ubuntu focal/stable arm64 containerd.io arm64 1.6.21-1 [20,3 MB]
Get:2 https://download.docker.com/linux/ubuntu focal/stable arm64 docker-ce-cli arm64 5:24.0.5-1~ubuntu.20.04~focal [12,0 MB]
Get:3 https://download.docker.com/linux/ubuntu focal/stable arm64 docker-ce arm64 5:24.0.5-1~ubuntu.20.04~focal [14,0 MB]
Fetched 46,3 MB in 15s (3.033 kB/s)
Selecting previously unselected package containerd.io.
(Reading database ... 166018 files and directories currently installed.)
Preparing to unpack .../containerd.io_1.6.21-1_arm64.deb ...
Unpacking containerd.io (1.6.21-1) ...
Selecting previously unselected package docker-ce-cli.
Preparing to unpack .../docker-ce-cli_5%3a24.0.5-1~ubuntu.20.04~focal_arm64.deb ...
Unpacking docker-ce-cli (5:24.0.5-1~ubuntu.20.04~focal) ...
Selecting previously unselected package docker-ce.
Preparing to unpack .../docker-ce_5%3a24.0.5-1~ubuntu.20.04~focal_arm64.deb ...
Unpacking docker-ce (5:24.0.5-1~ubuntu.20.04~focal) ...
Setting up containerd.io (1.6.21-1) ...
Created symlink /etc/systemd/system/multi-user.target.wants/containerd.service → /lib/systemd/system/containerd.service.
Setting up docker-ce-cli (5:24.0.5-1~ubuntu.20.04~focal) ...
Setting up docker-ce (5:24.0.5-1~ubuntu.20.04~focal) ...
Created symlink /etc/systemd/system/multi-user.target.wants/docker.service → /lib/systemd/system/docker.service.
Created symlink /etc/systemd/system/sockets.target.wants/docker.socket → /lib/systemd/system/docker.socket.
Processing triggers for man-db (2.9.1-1) ...
Processing triggers for systemd (245.4-4ubuntu3.22) ...
root@xcozy:~#
Melakukan pengecekan versi docker :
root@xcozy:~# sudo docker --version
Docker version 24.0.5, build ced0996
root@xcozy:~#
Mengecek status service docker apakah sudah berjalan atau belum
sudo systemctl status docker
root@xcozy:~# sudo systemctl status docker
● docker.service - Docker Application Container Engine
     Loaded: loaded (/lib/systemd/system/docker.service; enabled; vendor preset: enabled)
     Active: active (running) since Sun 2023-07-30 16:17:12 WIB; 1min 17s ago
TriggeredBy: ● docker.socket
       Docs: https://docs.docker.com
   Main PID: 26834 (dockerd)
      Tasks: 10
     Memory: 27.3M
     CGroup: /system.slice/docker.service
             └─26834 /usr/bin/dockerd -H fd:// --containerd=/run/containerd/containerd.sock

Jul 30 16:17:11 xcozy systemd[1]: Starting Docker Application Container Engine...
Jul 30 16:17:11 xcozy dockerd[26834]: time="2023-07-30T16:17:11.381792553+07:00" level=info msg="Starting up"
Jul 30 16:17:11 xcozy dockerd[26834]: time="2023-07-30T16:17:11.557488489+07:00" level=info msg="Loading containers: start."
Jul 30 16:17:12 xcozy dockerd[26834]: time="2023-07-30T16:17:12.150742174+07:00" level=info msg="Loading containers: done."
Jul 30 16:17:12 xcozy dockerd[26834]: time="2023-07-30T16:17:12.239057604+07:00" level=info msg="Docker daemon" commit=a61e2b4 graphdriver=overlay2 version=24.0.5
Jul 30 16:17:12 xcozy dockerd[26834]: time="2023-07-30T16:17:12.239820902+07:00" level=info msg="Daemon has completed initialization"
Jul 30 16:17:12 xcozy dockerd[26834]: time="2023-07-30T16:17:12.373258243+07:00" level=info msg="API listen on /run/docker.sock"
Jul 30 16:17:12 xcozy systemd[1]: Started Docker Application Container Engine.
root@xcozy:~#
root@xcozy:~#
Mensetting agar docker bisa berjalan otomatis pada start up dengan menjalankan perintah berikut ini :
sudo systemctl enable docker
root@xcozy:~# sudo systemctl enable docker
Synchronizing state of docker.service with SysV service script with /lib/systemd/systemd-sysv-install.
Executing: /lib/systemd/systemd-sysv-install enable docker
root@xcozy:~#
Menginstall docker compose dengan menjalankan perintah sebagai berikut :
sudo apt-get install docker-compose
root@xcozy:~# sudo apt-get install docker-compose
Reading package lists... Done
Building dependency tree
Reading state information... Done
The following additional packages will be installed:
  python3-attr python3-cached-property python3-docker python3-dockerpty python3-docopt python3-importlib-metadata python3-jsonschema python3-more-itertools python3-pyrsistent python3-setuptools
  python3-texttable python3-websocket python3-zipp
Suggested packages:
  python-attr-doc python-jsonschema-doc python-setuptools-doc
Recommended packages:
  docker.io
The following NEW packages will be installed:
  docker-compose python3-attr python3-cached-property python3-docker python3-dockerpty python3-docopt python3-importlib-metadata python3-jsonschema python3-more-itertools python3-pyrsistent
  python3-setuptools python3-texttable python3-websocket python3-zipp
0 upgraded, 14 newly installed, 0 to remove and 0 not upgraded.
Need to get 774 kB of archives.
After this operation, 4.038 kB of additional disk space will be used.
Do you want to continue? [Y/n] Y
Get:1 http://ports.ubuntu.com focal/universe arm64 python3-cached-property all 1.5.1-4 [10,9 kB]
Get:2 http://ports.ubuntu.com focal/universe arm64 python3-websocket all 0.53.0-2ubuntu1 [32,3 kB]
Get:3 http://ports.ubuntu.com focal/universe arm64 python3-docker all 4.1.0-1 [83,8 kB]
Get:4 http://ports.ubuntu.com focal/universe arm64 python3-dockerpty all 0.4.1-2 [11,1 kB]
Get:5 http://ports.ubuntu.com focal/universe arm64 python3-docopt all 0.6.2-2.2ubuntu1 [19,7 kB]
Get:6 http://ports.ubuntu.com focal/main arm64 python3-attr all 19.3.0-2 [33,9 kB]
Get:7 http://ports.ubuntu.com focal-security/main arm64 python3-setuptools all 45.2.0-1ubuntu0.1 [330 kB]
Get:8 http://ports.ubuntu.com focal/main arm64 python3-more-itertools all 4.2.0-1build1 [39,4 kB]
Get:9 http://ports.ubuntu.com focal/main arm64 python3-zipp all 1.0.0-1 [5.312 B]
Get:10 http://ports.ubuntu.com focal/main arm64 python3-importlib-metadata all 1.5.0-1 [9.992 B]
Get:11 http://ports.ubuntu.com focal/main arm64 python3-pyrsistent arm64 0.15.5-1build1 [51,3 kB]
Get:12 http://ports.ubuntu.com focal/main arm64 python3-jsonschema all 3.2.0-0ubuntu2 [43,1 kB]
Get:13 http://ports.ubuntu.com focal/universe arm64 python3-texttable all 1.6.2-2 [11,0 kB]
Get:14 http://ports.ubuntu.com focal/universe arm64 docker-compose all 1.25.0-1 [92,7 kB]
Fetched 774 kB in 3s (271 kB/s)
Selecting previously unselected package python3-cached-property.
(Reading database ... 166245 files and directories currently installed.)
Preparing to unpack .../00-python3-cached-property_1.5.1-4_all.deb ...
Unpacking python3-cached-property (1.5.1-4) ...
Selecting previously unselected package python3-websocket.
Preparing to unpack .../01-python3-websocket_0.53.0-2ubuntu1_all.deb ...
Unpacking python3-websocket (0.53.0-2ubuntu1) ...
Selecting previously unselected package python3-docker.
Preparing to unpack .../02-python3-docker_4.1.0-1_all.deb ...
Unpacking python3-docker (4.1.0-1) ...
Selecting previously unselected package python3-dockerpty.
Preparing to unpack .../03-python3-dockerpty_0.4.1-2_all.deb ...
Unpacking python3-dockerpty (0.4.1-2) ...
Selecting previously unselected package python3-docopt.
Preparing to unpack .../04-python3-docopt_0.6.2-2.2ubuntu1_all.deb ...
Unpacking python3-docopt (0.6.2-2.2ubuntu1) ...
Selecting previously unselected package python3-attr.
Preparing to unpack .../05-python3-attr_19.3.0-2_all.deb ...
Unpacking python3-attr (19.3.0-2) ...
Selecting previously unselected package python3-setuptools.
Preparing to unpack .../06-python3-setuptools_45.2.0-1ubuntu0.1_all.deb ...
Unpacking python3-setuptools (45.2.0-1ubuntu0.1) ...
Selecting previously unselected package python3-more-itertools.
Preparing to unpack .../07-python3-more-itertools_4.2.0-1build1_all.deb ...
Unpacking python3-more-itertools (4.2.0-1build1) ...
Selecting previously unselected package python3-zipp.
Preparing to unpack .../08-python3-zipp_1.0.0-1_all.deb ...
Unpacking python3-zipp (1.0.0-1) ...
Selecting previously unselected package python3-importlib-metadata.
Preparing to unpack .../09-python3-importlib-metadata_1.5.0-1_all.deb ...
Unpacking python3-importlib-metadata (1.5.0-1) ...
Selecting previously unselected package python3-pyrsistent:arm64.
Preparing to unpack .../10-python3-pyrsistent_0.15.5-1build1_arm64.deb ...
Unpacking python3-pyrsistent:arm64 (0.15.5-1build1) ...
Selecting previously unselected package python3-jsonschema.
Preparing to unpack .../11-python3-jsonschema_3.2.0-0ubuntu2_all.deb ...
Unpacking python3-jsonschema (3.2.0-0ubuntu2) ...
Selecting previously unselected package python3-texttable.
Preparing to unpack .../12-python3-texttable_1.6.2-2_all.deb ...
Unpacking python3-texttable (1.6.2-2) ...
Selecting previously unselected package docker-compose.
Preparing to unpack .../13-docker-compose_1.25.0-1_all.deb ...
Unpacking docker-compose (1.25.0-1) ...
Setting up python3-cached-property (1.5.1-4) ...
Setting up python3-more-itertools (4.2.0-1build1) ...
Setting up python3-attr (19.3.0-2) ...
Setting up python3-texttable (1.6.2-2) ...
Setting up python3-docopt (0.6.2-2.2ubuntu1) ...
Setting up python3-setuptools (45.2.0-1ubuntu0.1) ...
Setting up python3-zipp (1.0.0-1) ...
Setting up python3-pyrsistent:arm64 (0.15.5-1build1) ...
Setting up python3-websocket (0.53.0-2ubuntu1) ...
update-alternatives: using /usr/bin/python3-wsdump to provide /usr/bin/wsdump (wsdump) in auto mode
Setting up python3-dockerpty (0.4.1-2) ...
Setting up python3-importlib-metadata (1.5.0-1) ...
Setting up python3-docker (4.1.0-1) ...
Setting up python3-jsonschema (3.2.0-0ubuntu2) ...
Setting up docker-compose (1.25.0-1) ...
Processing triggers for man-db (2.9.1-1) ...
root@xcozy:~#
Installing the Pi-Hole Docker Container
This section will show you the process of installing Pi-Hole as a Docker container on your Linux-based system. All we need to do within this section is to write a “docker-compose” configuration file.
This file tells Docker what containers it needs to download and what ports it needs to open.
Creating a Directory for Pi-Hole
1. Start by creating a directory where you will store the configuration file for the Pi-Hole docker container.
We will do this by using the mkdir command to create a directory called “pihole” in our user’s home directory.
root@xcozy:~# mkdir /data/docker-data/pi-hole
2. Let us move into our newly created directory by using the cd command.
root@xcozy:/data/docker-data/pi-hole# mkdir etc-dnsmasq.d etc-pihole
root@xcozy:/data/docker-data/pi-hole# ls -l
total 12
-rw-r--r-- 1 root root  448 Jul 30 16:27 docker-compose.yml
drwxr-xr-x 2 root root 4096 Jul 30 16:27 etc-dnsmasq.d
drwxr-xr-x 2 root root 4096 Jul 30 16:27 etc-pihole
root@xcozy:/data/docker-data/pi-hole#de><a href="https://pimylifeup.com/pi-hole-docker/#copy">Copy</a>
Writing the Docker-Compose Configuration File
3. Our next step is writing the “docker-compose.yml” file. This file is where we will define the Pi-Hole docker container and the options we want passed to the container.
nano docker-compose.yml
4. Within this file, you will want to enter the following lines. We will explain the pieces you may want to modify shortly.
version: "3"

services:
  pihole:
    container_name: pihole
    image: pihole/pihole:latest
    ports:
      - "53:53/tcp"
      - "53:53/udp"
      - "67:67/udp"
      - "80:80/tcp"
    environment:
      TZ: 'Asia/Jakarta'
      WEBPASSWORD: 'MyPiHol3'
    volumes:
      - './etc-pihole:/etc/pihole'
      - './etc-dnsmasq.d:/etc/dnsmasq.d'
    cap_add:
      - NET_ADMIN
    restart: unless-stopped
Configuring the Pi-Hole Configuration File
5. Before you save this file, there are three Docker options that you will want to reconfigure for Pi-Hole to suit your setup better.
Setting the Password for the Pi-Hole Web Interface
Out of all the things to configure, you will want to set a secure password before running the Pi-Hole container. Pi-Hole will randomly generate the password if you don’t set a value.
Begin by looking for the following line within the configuration file.
# WEBPASSWORD: 'set a secure password here or it will be random'
Replace with the following, switching out “SECUREPASSWORD” with a secure password of your own. Try and use letters, numbers, and symbols.
WEBPASSWORD: 'SECUREPASSWORD'
Configuring the Web Interface Port of Pi-Hole
By default, we will set up the Docker container so Pi-Hole will be accessible through port80 on your system. This could be problematic if you already have something operating on port 80.
To change this, you will want to find the following line and change the number on the left side of the colon (:).
- "80:80/tcp"
For example, to change the port to “8080“, you would replace that line with the following.
- "8080:80/tcp"
Setting the Time Zone for the Pi-Hole Docker Container
By default, the Pi-Hole docker container has been configured to use the “Chicago” time zone. It is possible, however, to adjust this to your local time zone.
You can find a list of valid time zone values on Wikipedia. The value you want to use is in the “TZ database name” column.
To adjust the time zone, find the following line within the file.
TZ: 'Asia/Jakarta'
Adjust this value to match your time zone. For example, for Hobart, Australia, we would utilize the line below.
TZ: 'Australia/Hobart'
Saving the Docker-Compose File
6. Once you have made the above changes to the file, save and quit by pressing CTRL + X, followed by Y, then the ENTER key.
Disabling the Systemd-Resolve Service (Ubuntu Only)
7. If you are using an Ubuntu to run the Pi-Hole Docker container, you may need to disable the Systemd-resolve service.
Check the status of systemd-resolved service
sudo systemctl status systemd-resolved
root@xcozy:/data/docker-data/pi-hole# sudo systemctl status systemd-resolved
● systemd-resolved.service - Network Name Resolution
     Loaded: loaded (/lib/systemd/system/systemd-resolved.service; enabled; vendor preset: enabled)
     Active: active (running) since Sun 2023-07-30 16:25:04 WIB; 7min ago
       Docs: man:systemd-resolved.service(8)
             https://www.freedesktop.org/wiki/Software/systemd/resolved
             https://www.freedesktop.org/wiki/Software/systemd/writing-network-configuration-managers
             https://www.freedesktop.org/wiki/Software/systemd/writing-resolver-clients
   Main PID: 28815 (systemd-resolve)
     Status: "Processing requests..."
      Tasks: 1 (limit: 1085)
     Memory: 4.9M
     CGroup: /system.slice/systemd-resolved.service
             └─28815 /lib/systemd/systemd-resolved

Jul 30 16:25:04 xcozy systemd[1]: Starting Network Name Resolution...
Jul 30 16:25:04 xcozy systemd-resolved[28815]: Positive Trust Anchors:
Jul 30 16:25:04 xcozy systemd-resolved[28815]: . IN DS 20326 8 2 e06d44b80b8f1d39a95c0b0d7c65d08458e880409bbc683457104237c7f8ec8d
Jul 30 16:25:04 xcozy systemd-resolved[28815]: Negative trust anchors: 10.in-addr.arpa 16.172.in-addr.arpa 17.172.in-addr.arpa 18.172.in-addr.arpa 19.172.in-addr.arpa 20.172.in-addr.arpa 21.172.in-addr.ar>
Jul 30 16:25:04 xcozy systemd-resolved[28815]: Using system hostname 'xcozy'.
Jul 30 16:25:04 xcozy systemd[1]: Started Network Name Resolution.

root@xcozy:/data/docker-data/pi-hole#
The operating system uses this service to provide network name resolution. As Pi-Hole will want to operate on the same part the resolve service does, we need to disable it.
Start by stopping the systemd-resolve service by using the following command.
sudo systemctl stop systemd-resolved
8. With the service stopped, you will also want to disable it by using the command below.
Disabling the service will stop Ubuntu from starting it back up the next time you restart your device.
sudo systemctl disable systemd-resolved
9. With the “systemd-resolve” service now disabled, our next step is to modify the “/etc/resolv.conf” file to point to a different nameserver. By default, the nameserver will be configured to the systemd service.
Use the command below to begin modifying the configuration file.
sudo nano /etc/resolv.conf
10. You will want to find and replace the following line within this file.
nameserver 127.0.0.53
Replace it with the following. This changes the nameserver to Cloudflare’s 1.1.1.1 service dan Google DNS 8.8.8.8
nameserver 1.1.1.1
nameserver 8.8.8.8
root@xcozy:~# cat /etc/resolv.conf
# Generated by NetworkManager
nameserver 1.1.1.1
nameserver 8.8.8.8
root@xcozy:~#
11. Once you have made changes to this file, save and quit by pressing CTRL + X, followed by Y, then the ENTER key.
Starting the Pi-Hole Docker Container
12. We can finally start up Pi-Hole’s Docker container on our Linux system.
All you need to do now is run the following command within the terminal.
sudo docker-compose up -d
Please note this process can take a couple of minutes, depending on your device’s internet connection.
Accessing the Pi-Hole Web Interface
Now that we have the Pi-Hole docker container up and running on your system, we can proceed to use its web interface.
This web interface allows you to control all aspects of Pi-Hole on your system, so you won’t have to mess around with configuration files.
1. Before we begin, you will need to know the IP address of your device so that you can access the web interface.
The easiest way to get the local IP address is to use the hostname command.
hostname -I
2. With your local IP address, you will want to go to the following within your web browser.
Ensure you replace “IPADDRESS” with the IP you got in the previous step.
http://IPADDRESS/admin
If you changed the port away from “80“, you need to insert the port like shown below.
http://IPADDRESS:PORT/admin
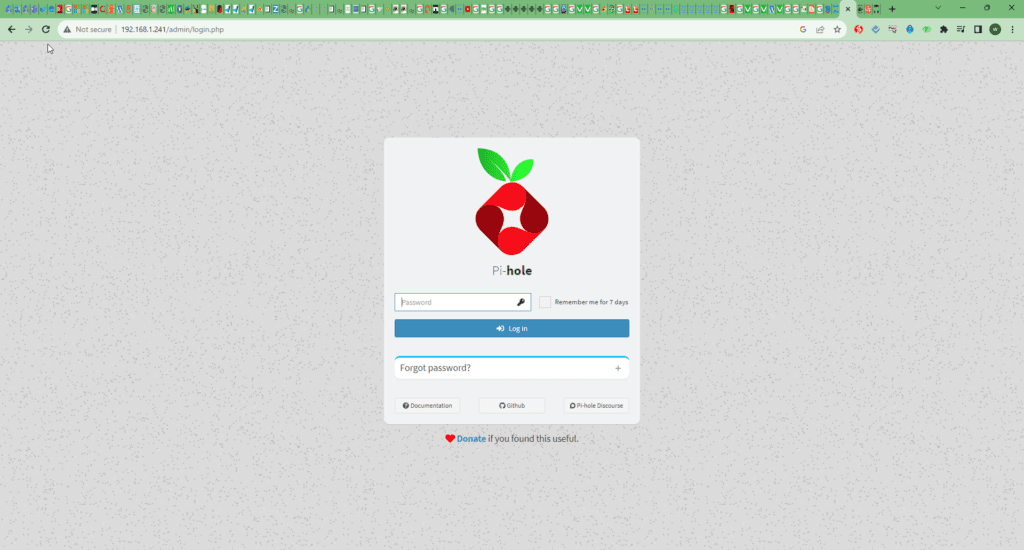
3. You should now be greeted with the login page for Pi-Hole.
To log in, you must type in the password (1.) you set when writing the Docker configuration file earlier.
With your password typed in, click the “Log In” button (2.)


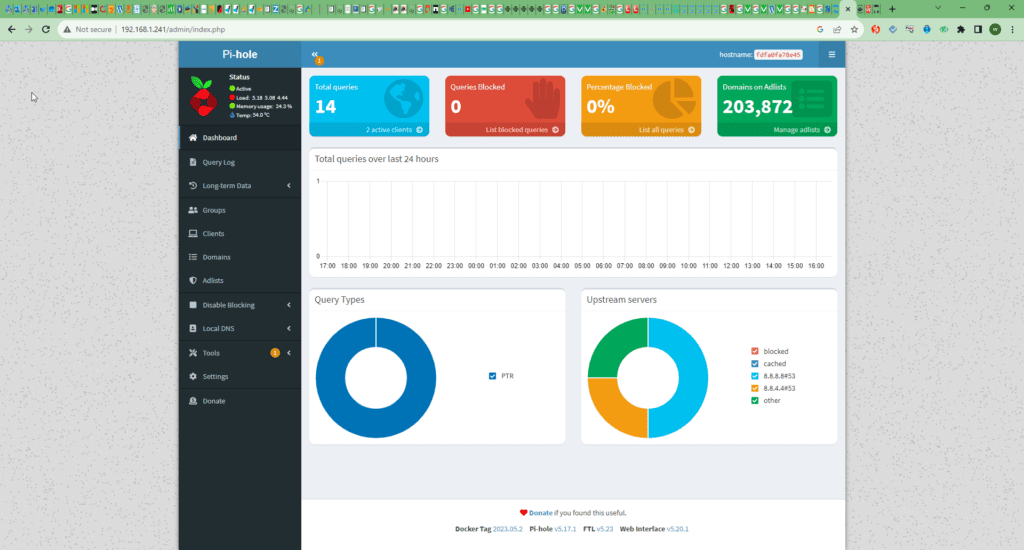
4. You now have access to the Pi-Hole dashboard running from within the Docker container.


5. With access to the dashboard, now is a good time to start changing your device’s DNS to use Pi-Hole.
We won’t be covering how exactly to do this in this guide. However, we have a guide that shows you how to change the DNS servers on Ubuntu.
When setting the DNS servers, you must use the IP belonging to the device you are running Pi-Hole on.
Conclusion
This tutorial shows you how to run Pi-Hole within a docker container on a Linux system.
Pi-Hole is a neat software that allows you to run a network-wide ad blocker easily. It works by handling your DNS requests and blocking domain names associated with ads.